How to Install KiCad Version 6 and Organize Part Libraries
Learn how to install the latest KiCad version 6 on your Windows system, migrate your libraries and a few tips for organizing and managing symbol and footprint libraries.

One of the best things that happened in 2021 for open source hardware enthusiasts is the development and release of KiCad Version 6. It was a near-complete overhaul of the much-admired open-source EDA suite used by professionals and hobbyists alike. Even though the stable version is available for download, the documentation is still in the works and we do not know when it will be finished. So we thought we should write a few brief tutorials explaining the overall changes from version 5 to 6 and introduce KiCad to new folks who are starting with electronics. The reason is that version 5 was a little ambiguous and unintuitive for beginners who had been using some other EDA tools like Eagle. Compared to that, KiCad version 6 is way more beginner-friendly.
In this tutorial, we will walk you through the important changes with version 6, how to install it and how you should manage the KiCad symbol and footprint libraries in your system. If you are new to KiCad and your system is fresh, follow the first part of this tutorial. If you already have KiCad installed, presumably version 5, and want to keep it for some reason, follow the second part of this tutorial to learn how to manage multiple KiCad installations and libraries. We will be using the latest KiCad version 6 release on a 64-bit Windows machine. We also assume you are familiar with Git version control. If not, it is a good time to learn it. Version control is essential for any iterative design process such as PCB designing. We use Git with KiCad. An alternative to Git is the CADLab.io platform which supports visual version control for KiCad source files.
Main Differences Between KiCad v5 and v6
- New File Formats: KiCad v6 uses a new non-backward compatible format for the schematic and PCB files. The new format is better than the old one and supports extensive features. To differentiate the new formats from old files, the file extensions have been changed. The schematic file has .kicad_sch, PCB file has .kicad_pcb and the project file has .kicad_pro extensions. KiCad v6 can still open any old files but they will be converted upon saving. So if you want to keep your old design files as it is, make a backup of them before opening them in KiCad v6.
- New Application Names: Applications names have been changed to more straightforward names such as Schematic Editor, PCB Editor, etc. instead of eeschema, pcbnew, etc.
- New Plugin and Content Manager (PCM): Previously we had to copy and paste entire plugin folders to some directory in order to get the plugins to work. That has changed. We now have a dedicated plugin manager for finding, installing, and updating KiCad plugins.
- New Library Format: Similar to the file formats, we also got new library formats. The old library format will be called Legacy Format and the new one as KiCad (as how it appears on the library manager). You can convert your existing legacy libraries to the new format right from the new library manager. If you are converting your projects from legacy formats with custom libraries, make sure to replace the symbols and footprints with new types.
- New Workflow: Previously we had to create netlists and manually import them to the PCB editor to start the PCB design – a process that never made sense at all. It was something the application should have been doing. That has been fixed. With KiCad v6, it is far easier to import changes from your schematic to PCB design and vice versa.
- Themes: Even though you could change the appearance of the schematic or the PCB in v5, themes are now a native feature in v6. You can create new themes and share them with others as JSON files.
Part 1: Fresh Start
If you are a complete beginner to KiCad, it would be better to start understanding how KiCad is organized in your system. We can start by installing KiCad. First, download the latest stable release for your operating system. The installer file you download will be around 1.5 GB. This is the standard installer and contains the application programs and the latest libraries pack. The application suite alone will be under 200 MB. The remaining is for the libraries. A lite installer (without libraries) file is available but only for nightly builds.
We have a detailed KiCad V6 tutorial written for beginners learning schematic and PCB designing. We cover most of the general aspects of using an EDA tool for PCB designing.
Getting Started with KiCad Version 6 : Beginner’s Tutorial to Schematic and PCB Design
Installation
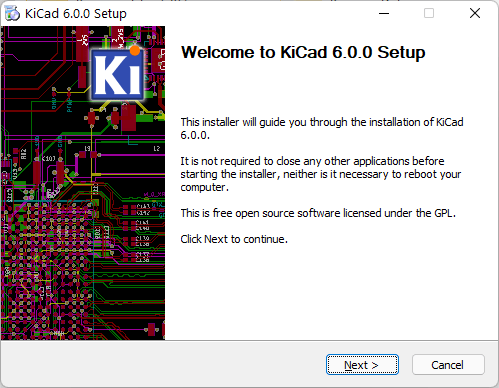
Open the installer by double-clicking it.
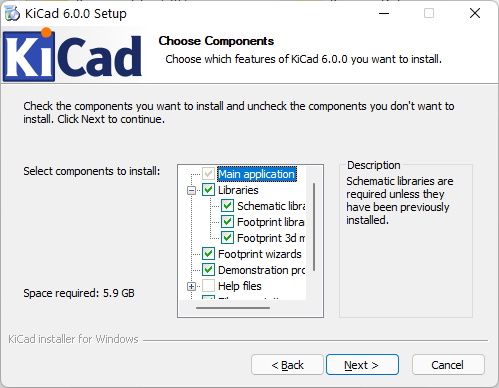
The first step is to choose what you want to install. The main application will be installed by default. If you are not maintaining any KiCad libraries yourself (you can have custom private libraries or standard libraries), then you can choose to install them from the installer package. Choose to install all three components; Schematic libraries, Footprint libraries, and Footprint 3d models. Each of these items belongs to a separate library.
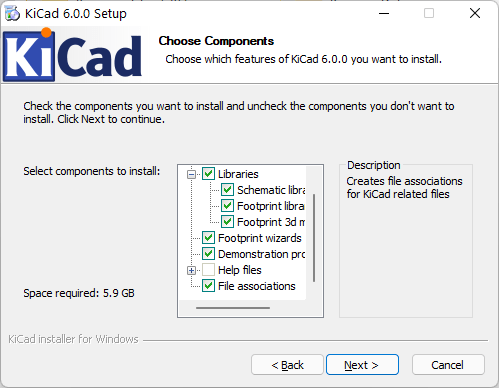
It is also a good idea to install the demo projects. You can open these projects as soon as you finish the installation. The demo projects can give you an overall idea of KiCad’s capabilities. Also, keep the file associations so that you can open KiCad files right from the file explorer.
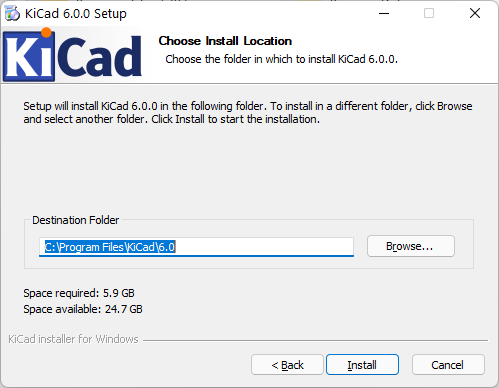
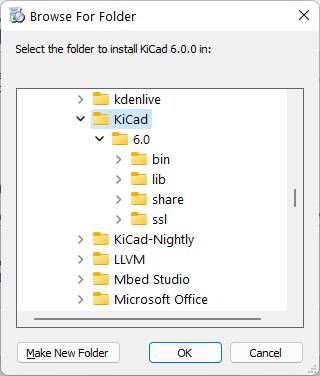
The next step is to choose where you want to install KiCad. Usually, this should be your system folder (C:\). By default, KiCad will be installed to C:\Program Files\KiCad\6.0. This was not the case with KiCad v5 which would be installed to C:\Program Files\KiCad. This also means that even if you have the v5 installed, there will be no conflicts when installing the v6 along with it, as the files remain in separate folders. For this tutorial, we will use the default location.
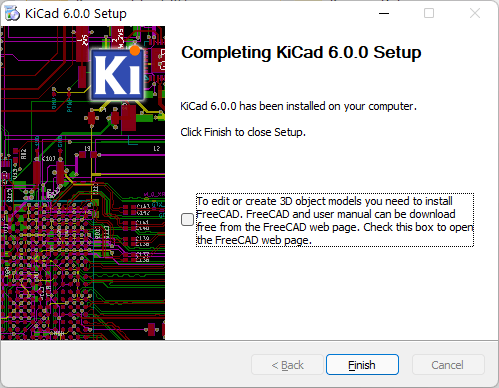
With that, we can finish the installation and KiCad icons should now appear on your desktop and start menu.
Installed Files
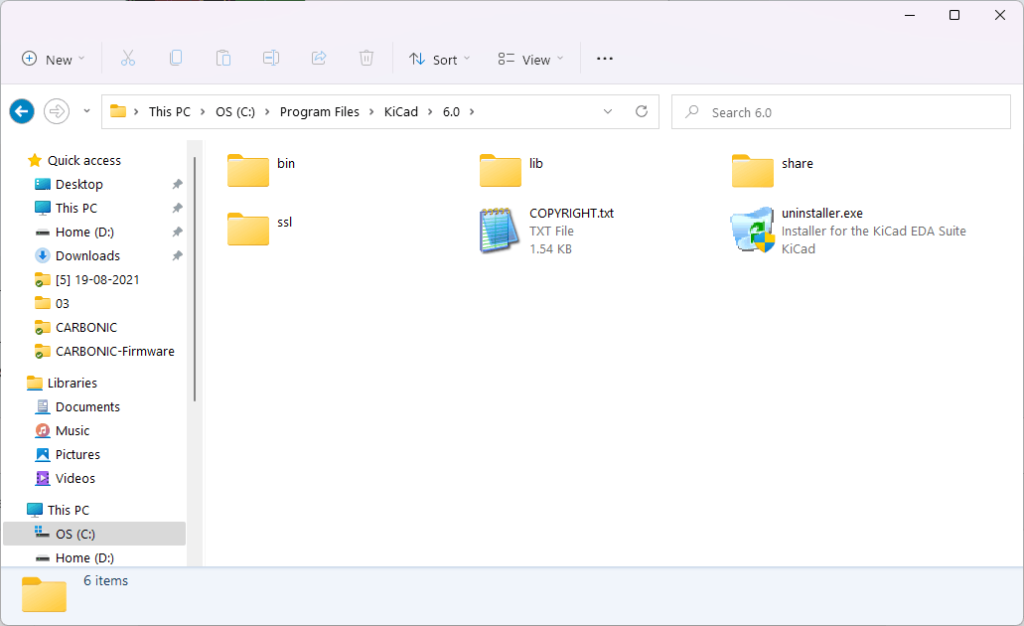
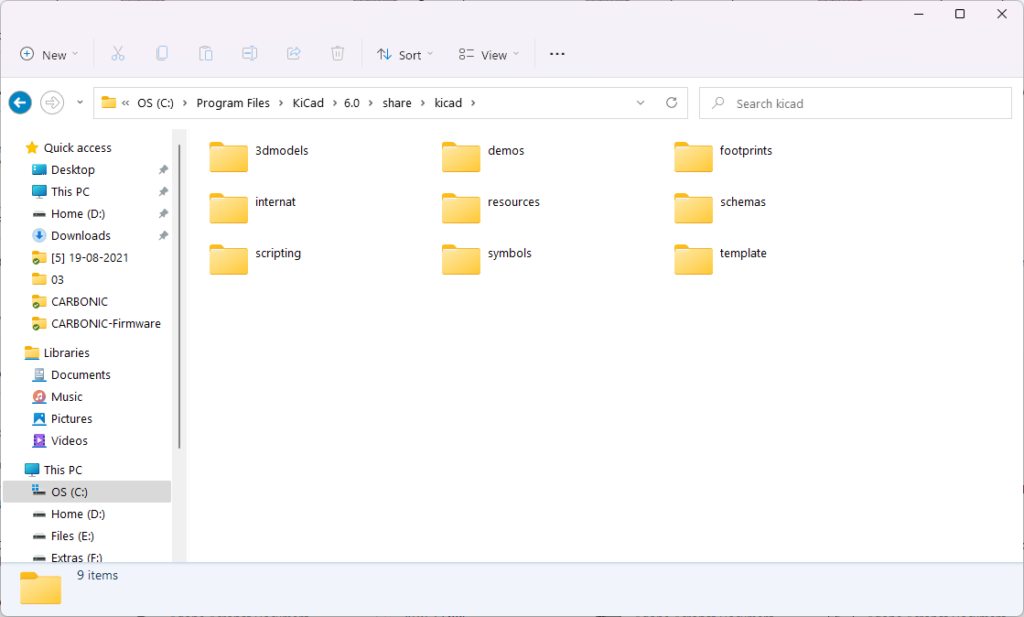
Now let’s have a look at the folder we just installed KiCad to. The bin has all the application files. share has all your libraries.
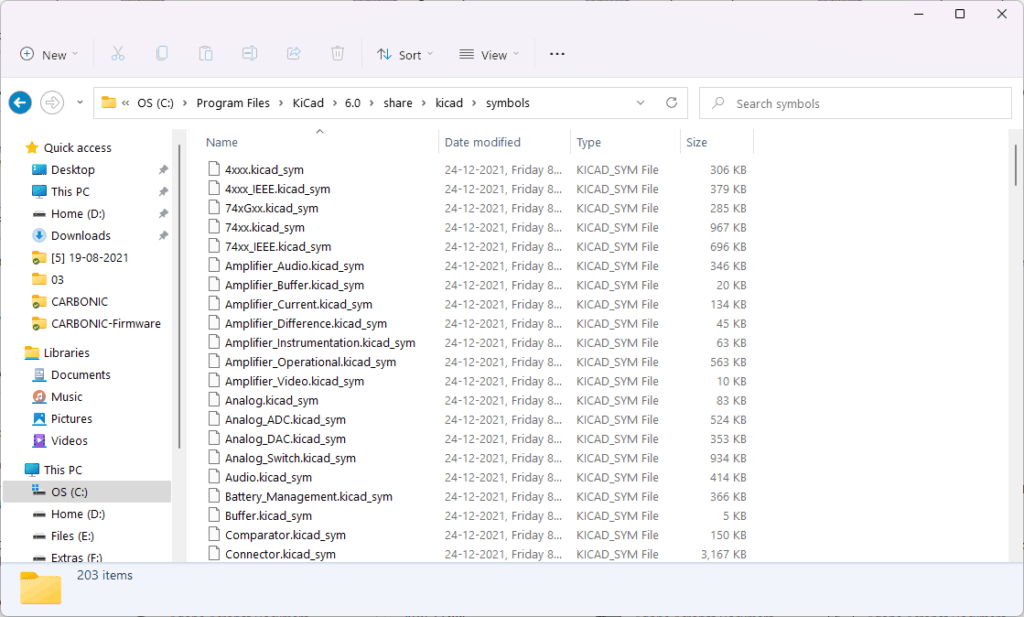
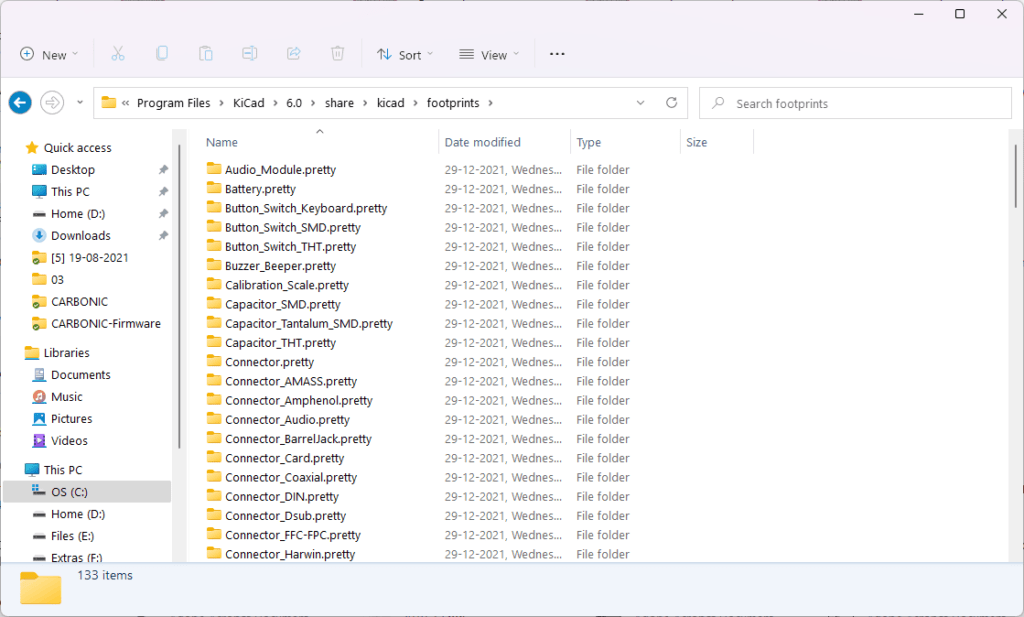
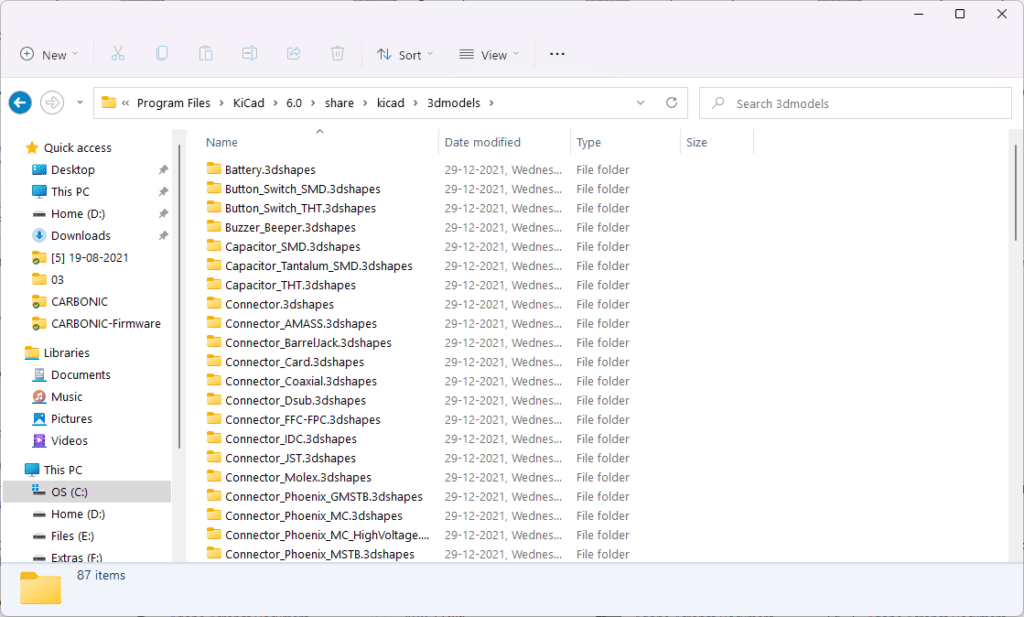
Managing Libraries
When you make changes to any components from the standard library, such as symbols or footprints, those changes will be saved to the share folder in the installation directory. But what happens when there is a new version of KiCad and you want to install it? Currently, KiCad does not have an update manager. You have to update it manually. When you install a new version or even the same installer, all files in the root directory will be overwritten. This means you will lose all the changes you have made to the component libraries. It is probable that you will accidentally overwrite your changes and that can really become a headache when you open your project files later and see them complaining about missing items.
So what’s the solution? Simple; keep your KiCad application directory and library directory separate. This way, you can always update your KiCad application by downloading and installing a new package without overwriting your modified libraries. But how do you tell KiCad where our libraries are at? There are two ways to do that; environment variables and path configurations.
Environment variables are OS-wide customizable placeholders that you can use anywhere in your operating system. For example, if I had a variable like PYTHON and set the value to my Python installation directory, any running app can fetch the value of the PYTHON variable and thus the installed directory. This is useful because I can change the value of the variable at any time but the variable name itself can remain unchanged. KiCad has a few sets of such environment variables. KiCad checks the presence of these variables in your system when it is launched. There are separate sets of v5 and v6 environment variables. This allows you to use different libraries for different versions.
KICAD6_3DMODEL_DIR– This is the location in your system where KiCad 3D shapes are stored. This is applicable only to v6.KICAD6_3RD_PARTY– This is where third-party applications and extensions are saved. For example, when you download a plugin, the packages are stored here.KICAD6_FOOTPRINT_DIR– This is where your footprints are located. Only applicable to v6.KICAD6_SYMBOL_DIR– This is where the schematic symbol library is located. Only applies to v6.KICAD6_TEMPLATE_DIR– Templates are worksheets that you can use for your KiCad drawings. Only applies to v6.KICAD_SYMBOL_DIR– This is also a schematic symbol library location but applies to v5.KICAD_TEMPLATE_DIR– v5 template directory.KICAD_USER_TEMPLATE_DIR– User-generated templates directory. We don’t know which version this applies to.KIGITHUB– This is the KiCad GitHub page link. KiCad is currently being maintained at Gitlab though.KISYS3DMOD– 3D shapes library for v5.KISYSMOD– Footprint library location for v5.
You can see the values of these by going to Preferences → Configure Paths. If you have these environment variables present on your system, any value set from this window will be ignored. This means the environment variables get precedence. For this reason, we do not use environment variables and instead set the paths directly on the application.
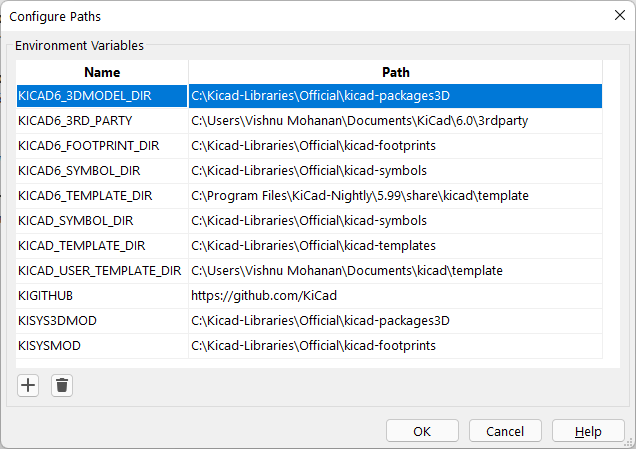
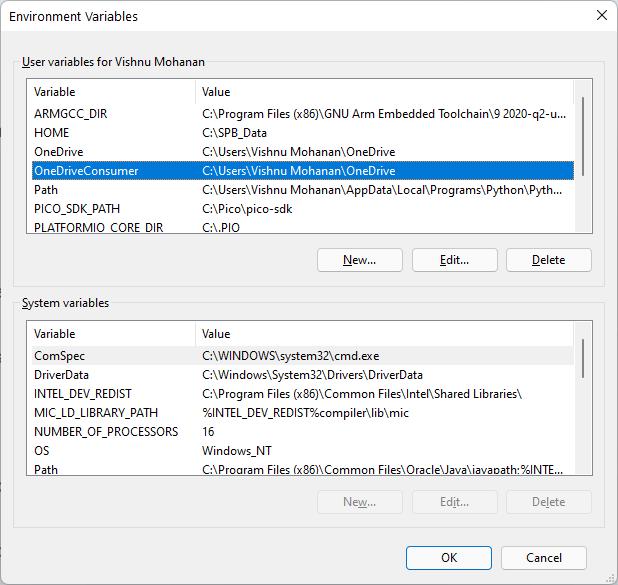
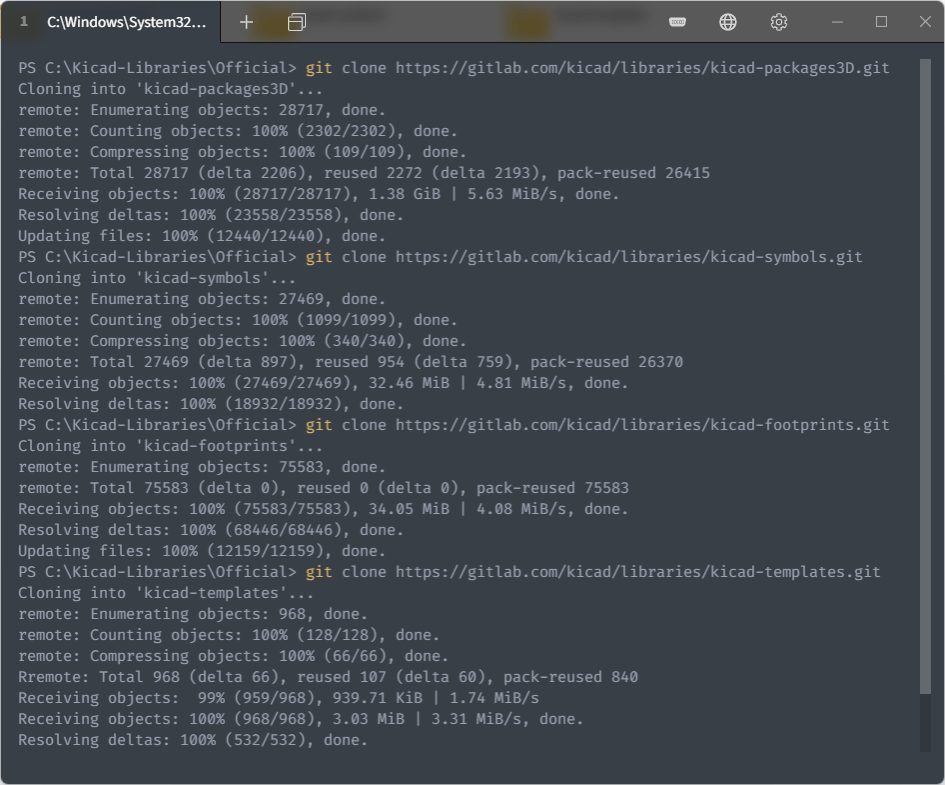
So where should we store the libraries? Anywhere that you are confident that they won’t be overwritten by a new installation process. What we recommend is to keep your official libraries and custom libraries separate. This way, official libraries can be updated at any time with a git-pull when there are new updates. Currently, the official libraries are located at KiCad Libraries at Gitlab (the ones at KiCad Github are old types and now have been archived). You can clone this library to your system and keep it synced with the latest changes.
When you want to create custom symbols, footprints, etc., save them to a custom library located elsewhere. With this method, you can avoid a lot of clashes and inconsistencies. Below is how we keep our libraries at CIRCUITSTATE.
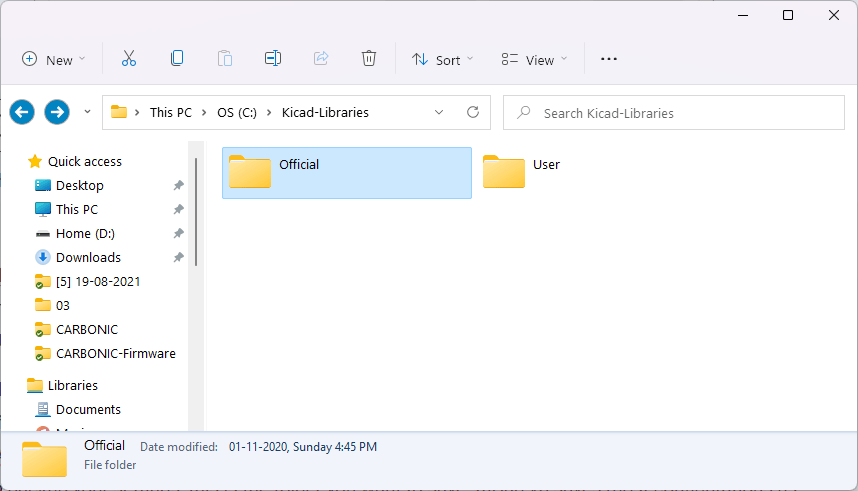
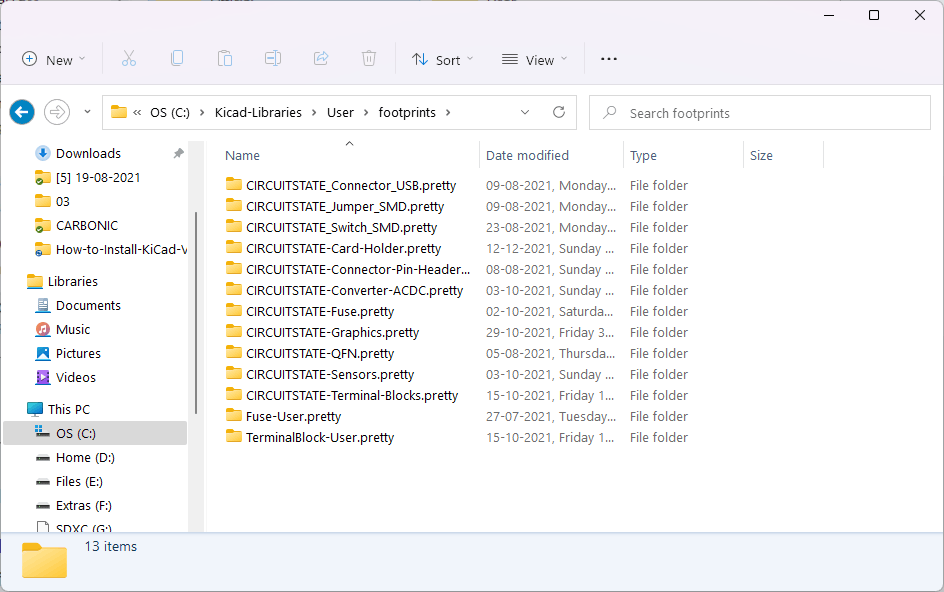
The Official has the official KiCad libraries cloned from Gitlab and the User has all of our custom part libraries. Our custom libraries are not public yet, but we will soon share them through our GitHub. We have to make many things right before we release them.
But how do we set two different paths as our default library locations? We can’t. KiCad can only accept a single path for each type of library. When we open KiCad, the program will automatically load libraries from the default locations and make them available to all our projects. KiCad considers the default libraries as Global Libraries in the global scope. The nice thing is that we can append to this list of global libraries by going to the Manage Symbol Libraries or an equivalent option from the Preference menu. You will see a window like below.
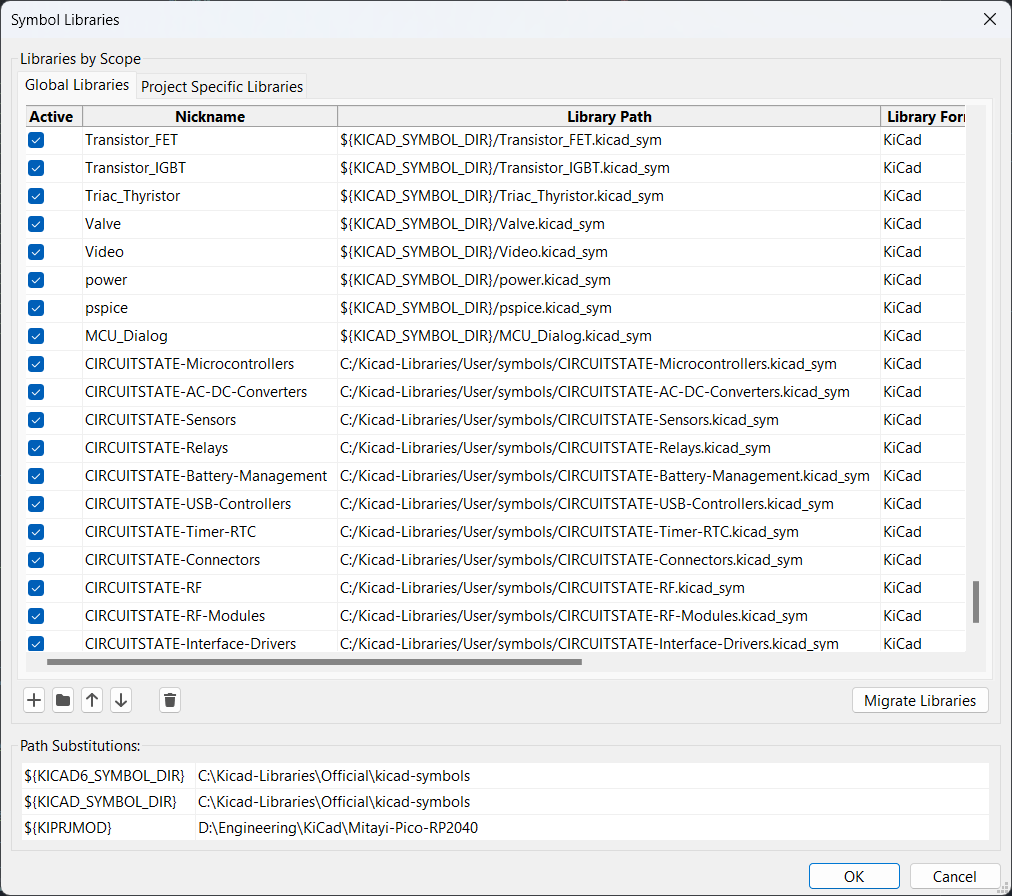
Here, you can see all the default libraries loaded by KiCad at the beginning of the list. At the end of the list are our custom libraries which are located elsewhere in the system. You can add custom libraries to the global scope using the folder icon on the bottom left that says Add existing library to table. KiCad will then regard the new libraries as global ones and make them available to all projects. This is how you can separately maintain both the official and user-generated KiCad libraries in your system. You can also add libraries specific to your projects by adding them to the Project Specific Libraries list.
Settings
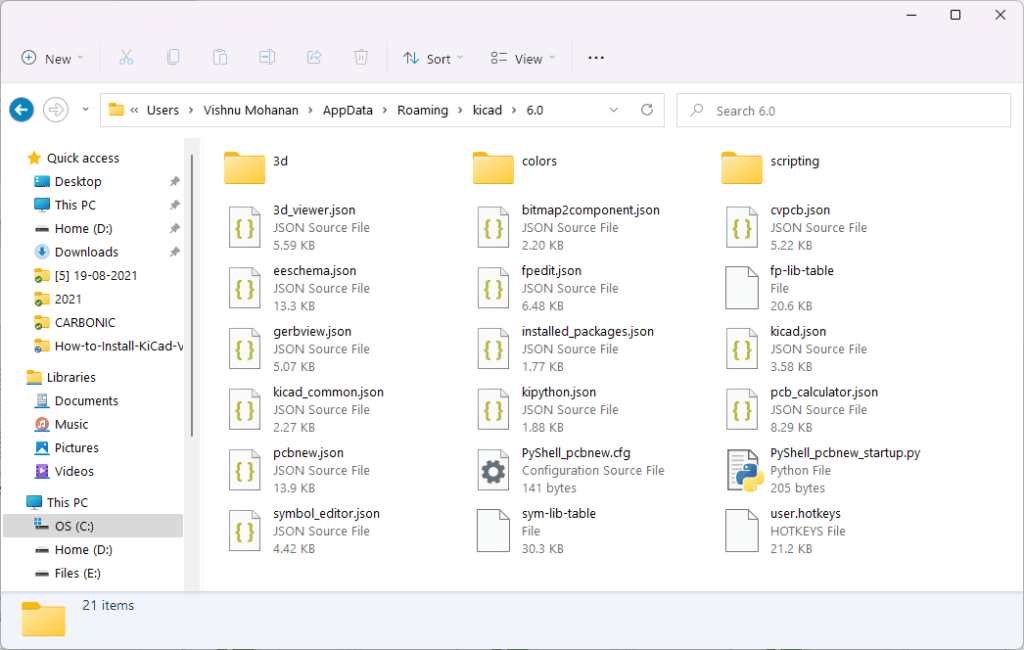
Would you lose your KiCad settings if you installed a new version? Fortunately, no. KiCad’s settings are stored in a different folder located inside your user Roaming folder. In our case, this is C:\Users\Vishnu Mohanan\AppData\Roaming\kicad\6.0. Settings for KiCad v5 will be stored just inside the kicad folder. If you want to backup your settings, this is the folder you want to save. KiCad v6 saves most configurations as JSON files.
Part 2: Side Loading and Migration
Can you install multiple versions of KiCad and maintain multiple versions of libraries on the same system? The answer is yes. Every major change made to KiCad v6 is done in such a way that is backward compatible. Therefore all your old project files, design files, libraries, etc. will be openable in KiCad v6, but workable only after you convert them to the new formats. If you want to keep your old version of KiCad for some reason, you can do so by using separate installation directories and library locations.
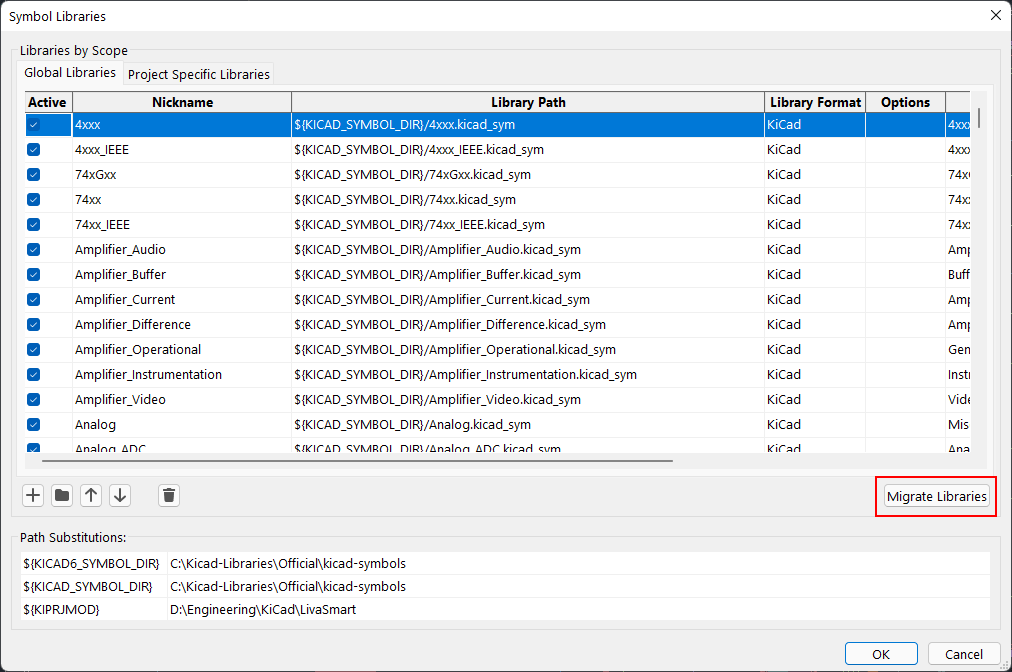
If you do not want to keep old versions but you have custom libraries in old formats, you can do a complete migration to KiCad v6 by converting all your existing libraries from the legacy version to the new version. This can be done from the Libraries Manager window. This makes sure that all your old footprints and symbols will become compatible and extensible with the new v6. Every other steps are identical to what we have explained in Part 1.
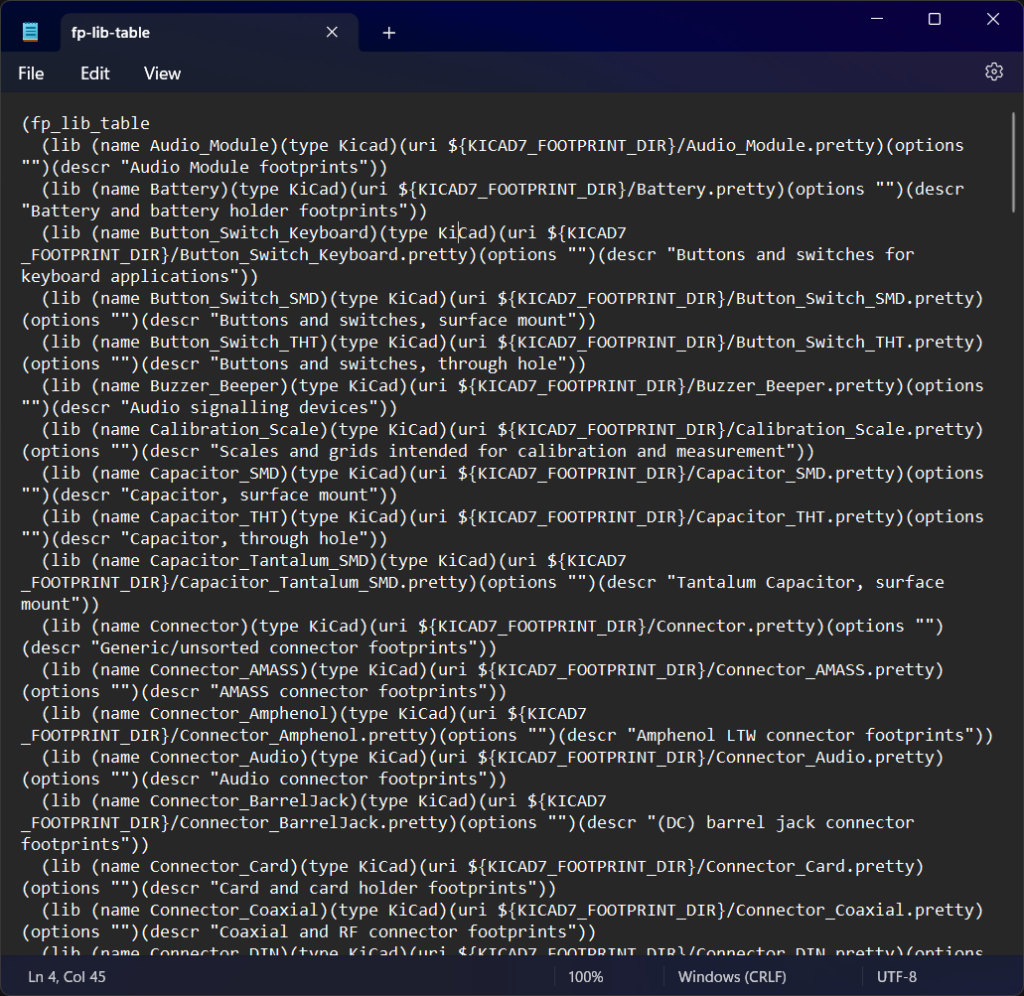
Sometimes KiCad will ask you to set Global Symbol/Footprint Libraries Table if it can not determine where your libraries are located. The table file is a method KiCad uses to keep track of the available libraries. It is a plain-text file that you can open in any text editor and will look something like below.
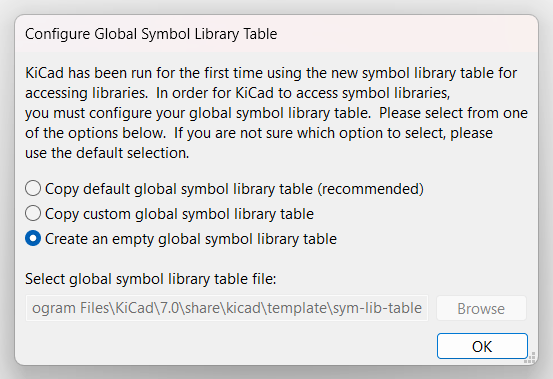
Just because KiCad can not locate the library table files does not mean your libraries are lost after an installation/update. This can happen, for example, after installing a new version of KiCad but without installing the default libraries. You can try manually deleting the library table files from the root folder (create backups first) and you will get the prompt when you run KiCad the next time. The three options you get are,
- Copy default global symbol/footprint library table (recommended) – KiCad will automatically determine the locations where it has installed the bundled libraries and the configuration folder. So if you already have the library tables in your system, KiCad can simply start using it.
- Copy custom global symbol/footprint library table – If you already have library tables saved elsewhere on your system that KiCad can’t automatically determine, then you can tell KiCad where the files are located. The option is a “copy” operation because KiCad makes a copy of the chosen file in the current configuration directory, leaving the original one untouched.
- Create an empty global symbol/footprint library table – This simply creates a new empty library table file at the default location. You can add all your libraries (symbols and footprints) manually later, by going to the Manage Symbol/Footprint Libraries option in the Preference menu.
That is all for this tutorial. Hope this helps you to get started with KiCad v6 in an organized way. Let us know if you have any improvement suggestions. Our next tutorial will be on designing your first schematic and PCB.
Happy KiCading 🔌
Links
Short Link
- Short URL to this page – https://circuitstate.com/installki6


One kink in my understanding of libraries. I see where there is a KiCAD setting to locate the KiCAD symbols and footprints etc that you put in \Kicad-Libraries\official, but I do not see a path that Kicad can use to get to your user libraries. Should KICAD_SYMBOL_DIR be set to C:\Kicad-libraries\official\kicad-symbols or simply to C:\Kicad-Libraries. I don’t understand how Kicad finds your user directory.
You are right. KiCad can only accept a single path as its default location for symbols/footprints/shapes. So whenever we start a new project, KiCad will automatically load all the parts from those default locations (in my case C:\Kicad-libraries\official\..) and we should be able to use them. KiCad considers the default locations as “Global Libraries” which have Global Scope (available to all projects). But we can also tell KiCad to load parts from other locations as well, by appending the global list of libraries. This is not done through path setting, but by directly adding non-default/custom libraries through the “Manage Symbol Libraries” or equivalent option from the Preference menu. You can see this in the below screenshot. I have added my custom libraries to the global list using the Add buttons found on the left side of the window. KiCad will regard all my custom libraries as global ones and make them available to all my projects.
Additionally, we can add libraries specific to a single project. It can be set from “Project Specific Libraries”. I will update the post with this explanation. Thank you, Jon 🙂
I have installed ver 6.0.10 and all the libraries are in the correct folders according to this tutorial. But there are no components available in the schematic editor. The paths for the symbol library is also correct. I have tried to download other symbol libraries but they all have errors. I guess they can’t be used in ver 6.0.10.
Also there is no “manage Footprint Libraries” in the preferences menu as i understand it there is in version 5.
If you don’t see any symbols libraries when opening the symbol placer, then KiCad has not loaded or found any at the locations specified. You can open the library manager in KiCad and see if any libraries are loaded at all. Usually, confusion can arise between using the Environment Variables and the in-app library path configurations. These two methods are mutually exclusive, with the Env Variables getting higher priority. That means, if KiCad finds the Env Variables in your OS settings, all path configuration inside the KiCad app is ignored. So I suggest the following,
1. Make sure you have your libraries (V6 compatible) at some location on your computer with short path names and probably without any space characters in the path. The path should be accessible by KiCad app with enough permissions. Also, make sure the folder is not synced by some backup apps such as OneDrive. Users have reported issues in some instances.
2. Use only one method for setting paths; either Env variables or in-app settings.
3. Confirm that your libraries are loaded from the library manager/explorer in KiCad.
The “Manage Footprint Libraries” option is only available from the PCB Editor app. The Schematic Editor has the equivalent “Manage Symbol Libraries” option. Let us know if you are able to fix the issue.