Installing Development Tools : Learn Microcontroller with STM8S – Tutorial Part #3
We are now ready to install all of the software tools required to write, compile, upload and debug the code for the STM8S microcontroller. We will stick with free and easily accessible tools for our tutorial series so that you don’t have to pay for anything. We will use a 64-bit Windows 11 PC for showing all of the installation procedures. If you are on a different operating system, things can still be installed but you just need to download the OS-specific installers. Check out the previous tutorial below.
The STM8S103F3P6 Development Board : Learn Microcontroller with STM8S – Tutorial Part #2
Tutorial Series
- Learn the fundamentals of microcontrollers.
- Familiarize with a simple STM8S microcontroller.
- Install all the software tools and prepare your computer for programming and debugging microcontrollers.
- Get hands on experience with connecting your first microcontroller board and write a program for it.
- Learn the concepts of timers and interrupts in microcontrollers and blink an LED with what you learn.
- Learn how to make your microcontroller interact with the world by reading a push-button.
- Learn how to read a push-button using external interrupts without blocking critical code.
What You’ll Learn
- How to install and configure all the software required to develop applications for the STM8S family of microcontrollers.
Development Environment
When we say development environment, it is a collection of software tools that allow you to write, compile, upload, debug and inspect the code you write. Sometimes, these tools are combined into a single software package and you only need to launch just that application. Development environments supplied directly by the manufacturers are usually in this format. But many times, the tools developed and distributed by third party companies and individuals outperform the official ones. So it all comes to the users convenience to which software tool to use for embedded development. In this tutorial, we will learn where to find the tools needed to work with the STM8S microcontroller and how to setup and configure them. Before that, let’s see the type of tools we are going to install and will need in the future.
Code Editor
A code editor is simply a text editor tailored for writing computer code. Most code editors support features like syntax highlighting, auto completion, auto indentation, code folding, syntax checking etc. These features save a lot of time of the developer and help them write code much faster than a normal text editor.
Compiler
In simpler terms, a compiler is a software tool which will convert the human-readable code to a machine-readable format. The human-readable code is instructions written in some type of high-level programming language. A computer can only understand instructions provided in the binary format and it has to reside in the memory. But writing instructions in the binary format is too difficult for humans to do. So a compiler bridges the gap between the two and acts as a translator between humans and computers. The task of converting high-level program to machine code is called compilation.
The programming language we are going to use for this series of tutorials will be Assembly Language, and C/C++. There are separate compilers that convert Assembly to binary and C/C++ to binary.
Uploader
After compilation, the machine code has to be transferred to the target system’s memory. This process is usually called uploading or flashing (since Flash memories are involved). An uploader is a tool that accepts the machine code in some format, and transfers that into the target memory via some type of interface, which can be a serial connection, parallel interface, SWD, JTAG, or other.
Debugger
A debugger is a tool that helps to inspect the execution of the code in a target system. A debugger interface can run on a host system and it can communicate with the target system through some kind of interface. The debugger will let us see the values of the internal registers, the instruction being executed and other information. With the help of the debugger, we can pause, resume and rest the code execution as well as read/write the registers or memory.
IDE
An Integrated Development Environment, as the name suggests, is a combination of tools we have explained earlier. It gives you a unified interface to work with all of the tools necessary to develop computer software, from writing to debugging. All microcontroller manufactures will have some kind of official IDEs to support the microcontrollers they make. For example, ST Microelectronics have STM32Cube for its 32-bit microcontrollers.
VS Code
Visual Studio Code, or VS Code, is a free and open-source modern code editor from Microsoft. It is a sibling to the popular Visual Studio IDE. In contrast to the Visual Studio IDE, the VS Code is not an IDE, but a code editor only. Even though it does not come with compilers or other tools, we can make VS Code talk to external tools to get done what we need. This is mostly done with the help of extensions and configuration scripts. Following are the main features of VS Code.
- Free and Open-source: You don’t need to pay for downloading and getting updates.
- Cross-platform: VS Code runs on almost all platforms and you get seamless updates.
- Extremely Fast and Lightweight: Even though written mostly in Javascript and Typescript, VS Code runs blazingly fast on your computer while consuming fewer resources.
- Near-infinite Customization: VS Code uses text-based JSON files for configuration and almost any feature of VS Code can be customized by updating the JSON settings files.
- Awesome Extensions: VS Code has a marketplace for extensions/plugins developed by both Microsoft and other developers. Extensions extend the capabilities of VS Code. The underlying web technologies used for VS Code make it easy to develop powerful extensions.
- Beautiful Themes and Icons: VS Code is highly customizable in its appearance; from fonts to icons. Themes and icon packs can be downloaded from the extension marketplace.
- Integrated Consoles/Terminals: You don’t need to leave the VS Code window to run your console applications such as Powershell. Terminals are an integrated feature of VS Code and you can run multiple terminals at the same time.
- Integrated Git Version Control: Versioning your projects is easy with VS Code.
- Integrated Github Syncing: You can sign in with your GitHub account and push/pull your projects from GitHub.
- Rich Text Editor: The text editor comes with powerful editing features that help you type, copy, paste, duplicate, find, and replace items much faster than conventional text editors. VS Code can selectively use syntax highlighting depending on the type of file opened.
- Code Completion: VS Code can suggest function names, variables, class names, keywords, etc. as you start typing. If you choose a suggestion that is a snippet, VS Code will automatically create the basic construct/template for that keyword. For example, a
switchkeyword will create a new switch construct with brackets and right indentations. - Code IntelliSense: VS Code can scan your project dependencies, locate where they are, and find code references from all those files. You can hover over an item to see its value or reference and Ctrl + Left Click to open the reference.
Installing VS Code
To get started, first download VS Code for your preferred OS. There are two types of installers for VS Code.
- System Installer – this is used for operating systems with the main user as the sole administrator of the system. This installer and subsequently the VS Code installation runs with administrator privileges. If you are the admin of your system, you can choose this installer.
- User Installer – this can be used by a user of an operating system without admin privileges. VS Code will not need admin privileges to run. If you are not an admin of your system (for example, if the computer is provided by your employer), you can choose the user installer. When a user-installed VS Code is run with admin privileges, automatic updates will be paused.
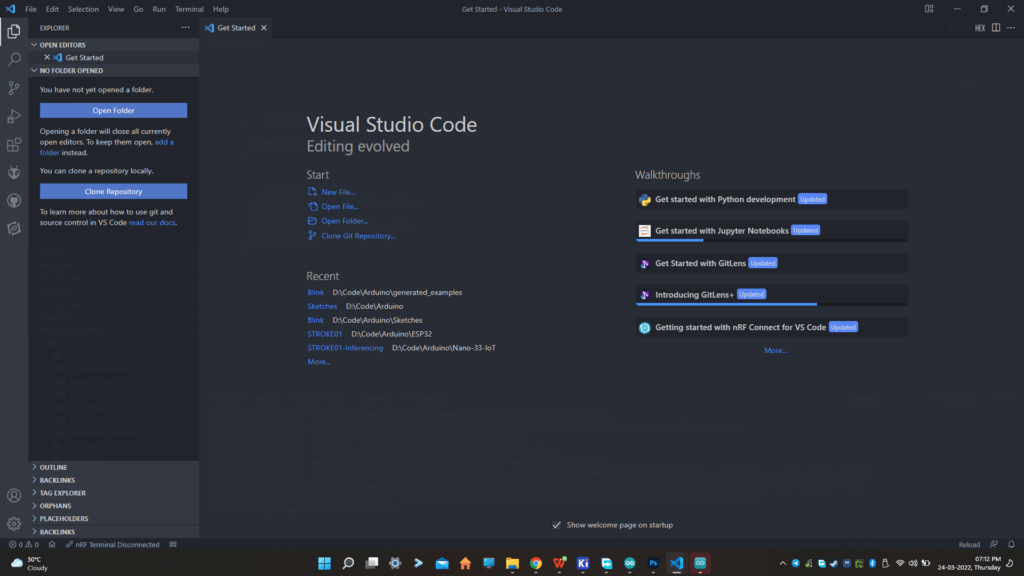
Run the downloaded installer and choose a path on your system. By default, VS Code is installed under C:\Users\{Username}\AppData\Local\Programs\Microsoft VS Code. More information on installing can be found here. Once installed launch VS Code from your desktop or main menu. You will be welcomed with the getting started page. The screen you will see can be different from ours because we have customized the looks and functionalities of our VS Code.
The basic layout is as follows,
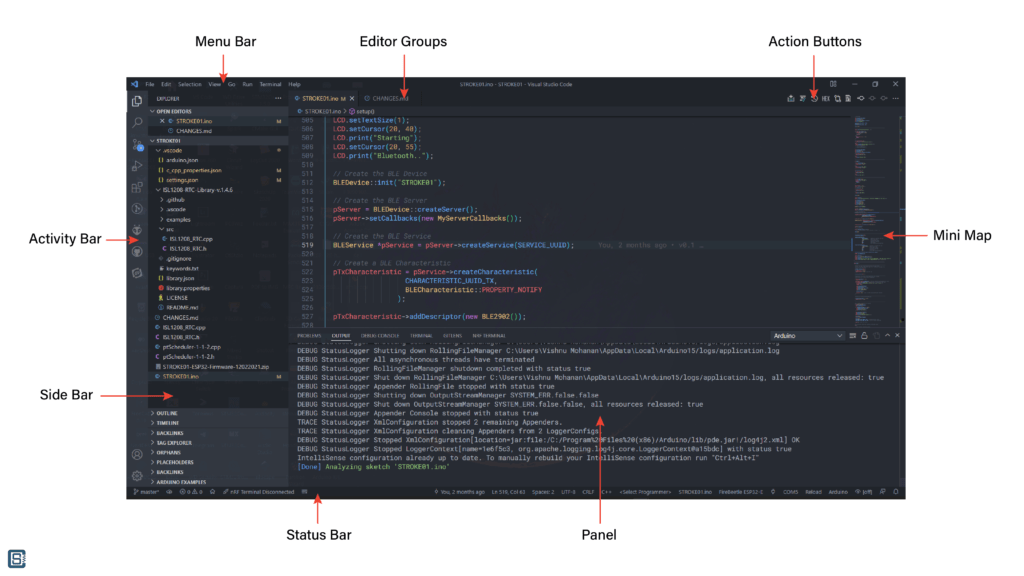
VS Code comes with a simple and intuitive layout that maximizes the space provided for the editor while leaving ample room to browse and access the full context of your folder or project. The UI is divided into five areas:
- Editor – The main area to edit your files. You can open as many editors as you like side by side vertically and horizontally.
- Side Bar – Contains different views like the Explorer to assist you while working on your project.
- Status Bar – Information about the opened project and the files you edit.
- Activity Bar – Located on the far left-hand side, this lets you switch between views and gives you additional context-specific indicators, like the number of outgoing changes when Git is enabled.
- Panels – You can display different panels below the editor region for output or debug information, errors and warnings, or an integrated terminal. Panel can also be moved to the right for more vertical space.
- Action Buttons – Allows you to perform various tasks provided by the extensions.
Each time you start VS Code, it opens up in the same state it was in when you last closed it. The folder, layout, and opened files are preserved. Open files in each editor are displayed with tabbed headers (Tabs) at the top of the editor region.
Workspace
In VS Code, a workspace refers to a folder where your project files are stored. When you open a folder, all the files and folders inside that root folder will be displayed on the file explorer on the sidebar. You can create new files, and delete or rename files right from the sidebar. VS Code will automatically create a folder called .vscode to store configuration files and temporary files.
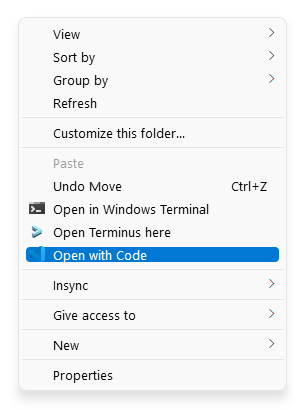
In Windows, you can right-click on an empty space in a folder in File Explorer to open the context menu and use Open with Code option to open a folder as a workspace. You can also open a folder from File menu. By default, the folder will open in the existing window if the VS Code is already open. To open the new workspace in a different window, simply hold down Shift button when you click the context menu option.
Tips & Tricks
Below is a list of tips and tricks we know of. You can help us expand this list if you know more tricks to save time and increase productivity.
- Hover over any item to see its declaration and press Ctrl key while hovering to see the part of the definition of the item.
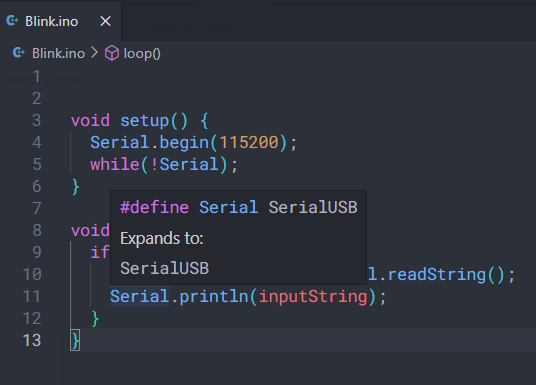
- Ctrl + Left Click on an item opens its reference. If there are multiple references, you will get an interactive list of them.
- User Arduino IDE’s Use external editor feature to always use VS Code as the editor. This will sync changes made in VC Code to the Arduino IDE.
- Use Alt + Up / Down arrow keys combinations to move the active lines up or down.
- User Alt + Left Click to place a cursor anywhere on the file and start typing at multiple locations at once.
- Use Ctrl + Left / Right arrow keys to move the cursor through words than letters. Use the Shift key in combination with this to select the line instead of just moving the cursor.
- Use Ctrl + Backspace to delete blocks of characters.
- Use Shift + Home to the active line to the leftmost non-whitespace character. This helps to easily rewrite the current line.
- Use Ctrl + L to select the entire active line.
- Use Ctrl + Shift + K to delete a line.
- Use Shift + Alt + Up / Down keys to duplicate the current line.
- To copy an entire line, you don’t need to select it. Instead, simply press Ctrl + C when the cursor is anywhere on the line.
- Similarly to cut a line simply press Ctrl + X. This can also be used to quickly delete a line.
- Press the scroll wheel of your mouse and drag on your code to marquee select the code. This can also place multiple cursors at once.
- Use Tab to indent to the right and Shift + Tab to indent to the left.
- Use Ctrl + Shift + \ to jump to the matching bracket.
A complete list of default shortcuts can be found here in this PDF.
Suggested Extensions
PlatformIO
PlatformIO is a unified embedded software development ecosystem that brings multiple microcontroller/microprocessor architectures, products, toolchains, libraries, and hardware under one roof. It was developed by PIO Labs. It is a free and open-source project consisting of multiple platform definitions, toolchains, board definitions, framework repositories, libraries, examples, add-on software components, and documentation. The main component of PlatformIO (PIO) is a CLI (Command Line Interface) tool or a software add-on usually installed as an extension to an existing IDE (Integrated Development Environment). PlatformIO can be incorporated into popular IDEs like Eclipse, VS Code, CLion, etc, but Visual Studio Code is by far the best-supported and recommended IDE. PIO can be installed as a free extension to VS Code from the marketplace. It will install everything you need on your computer, regardless of which operating system you are using. To install and configure PlatformIO, please follow the tutorial below.
Getting Started with PlatformIO – Unified IDE for Embedded Software Development
NakenASM
NakenASM is an open-source assembler, linker, disassembler and simulator for multiple target CPUs. It was developed by Michael Kohn. NakenASM supports the STM8 family of microcontrollers with stable support for simulation. We will use NakenASM to process our Assembly language programs for the STM8S microcontroller.
Installation
Installing NakenASM is easy. Just download a compatible binary file and install it. For Windows, it is just a ZIP archive that you can extract to anywhere on your PC. Download the file naken_asm-2024-02-10.zip (Windows Binary) in this case. We are going to extract it to a folder at C:/Apps/.
In order to use the tool from everywhere on your PC, you need to add the application to the Windows Path variable. You can go to System Properties → Environment Variables and add the complete path of the NakenASM tool to the Path variable. Click on Edit → New and add the complete path to a new line.
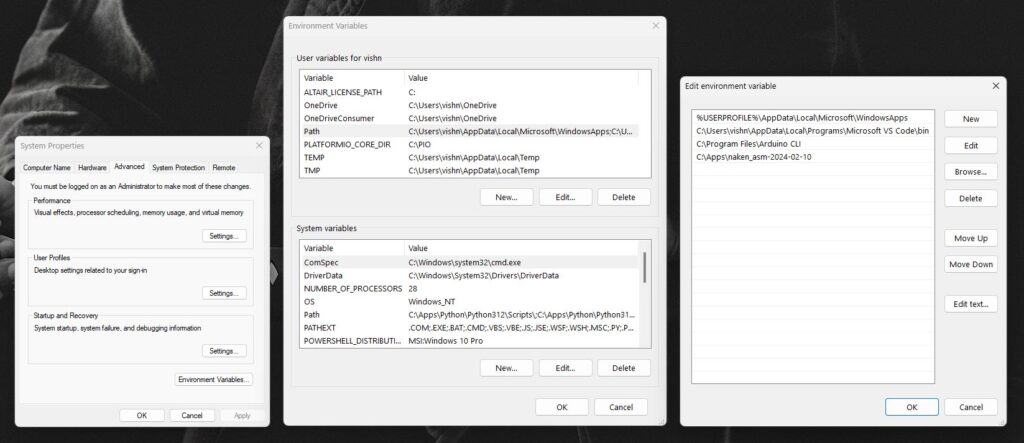
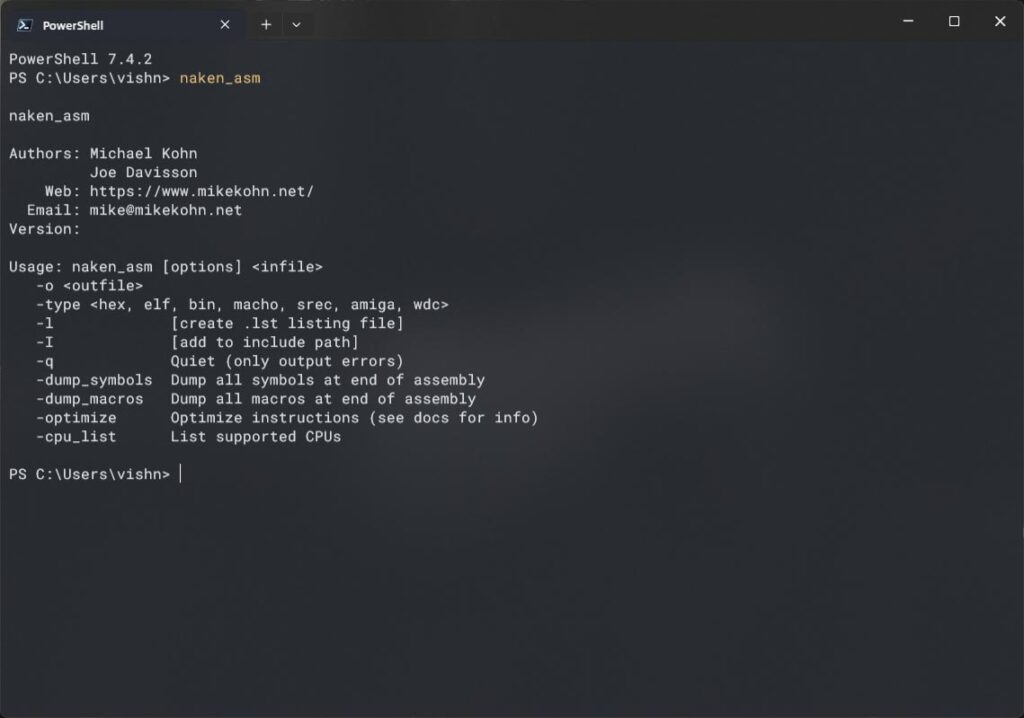
Now you can open the Terminal and type naken_asm to see if the tool is available from the CLI. If you haven’t replaced your old CMD tool with the modern Windows Terminal yet, now is the best time to do it.
naken_asmIf you can see the information printed by the tool, then it is added to the Path correctly. If it is not working, try adding the path again to the Path under System variables instead of User variables.
STM8FlashTool
The STM8FlashTool is a tool to upload the firmware to the microcontroller. Unfortunately, this tool doesn’t have any prebuilt binaries available on the repo page. Instead we can find a prebuilt binary from the PlatformIO tools package. Install the package with the following command.
pio pkg install --global --tool "platformio/tool-stm8flash@^1.1.20170616"You need to add the PlatformIO to the Path variable in order to execute this command from anywhere on your PC. You can do that by adding the scripts folder, in our case at C:\PIO\penv\Scripts, to the Path variable.
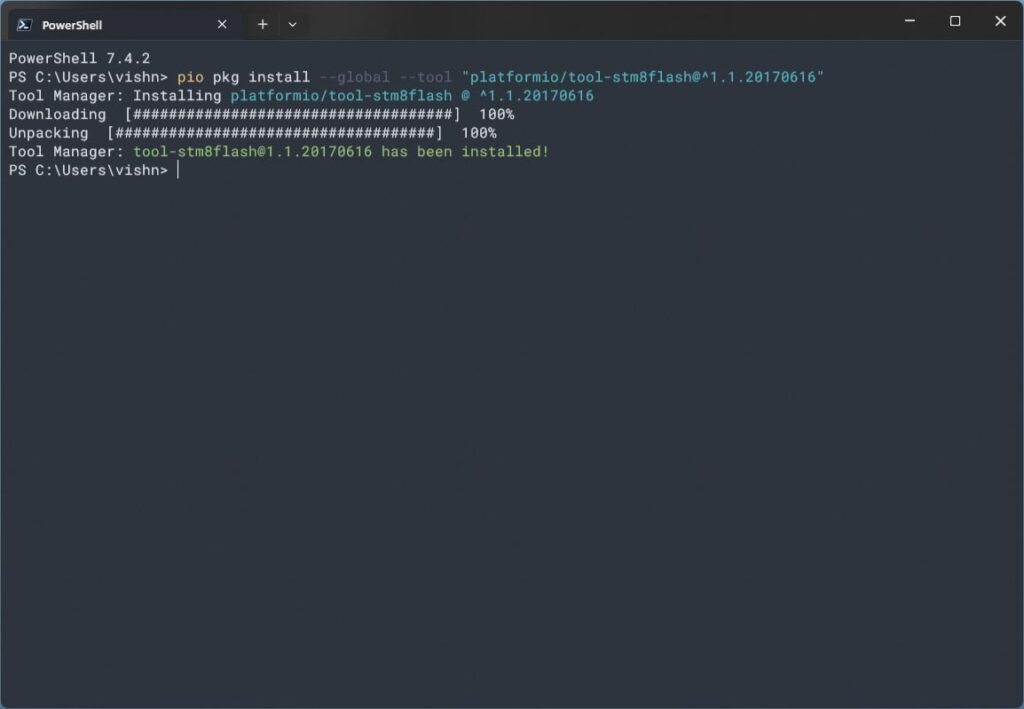
This will create a new folder called tool-stm8flash to the packages directory of PlatformIO. Now add this path to the Path variable and run the following command.
stm8flash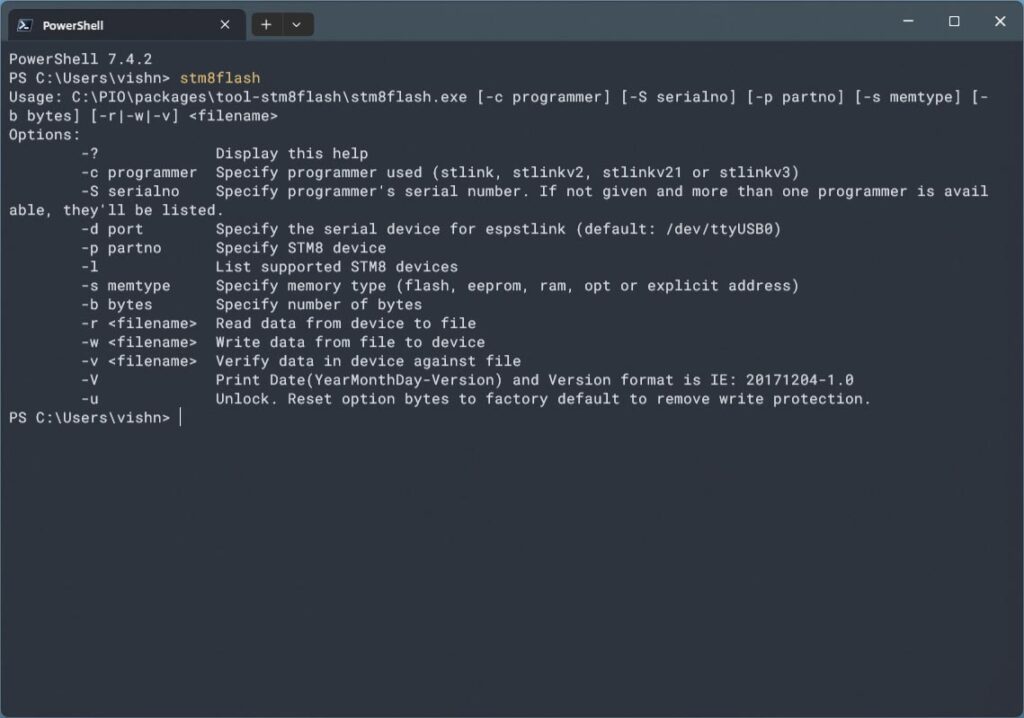
STVP
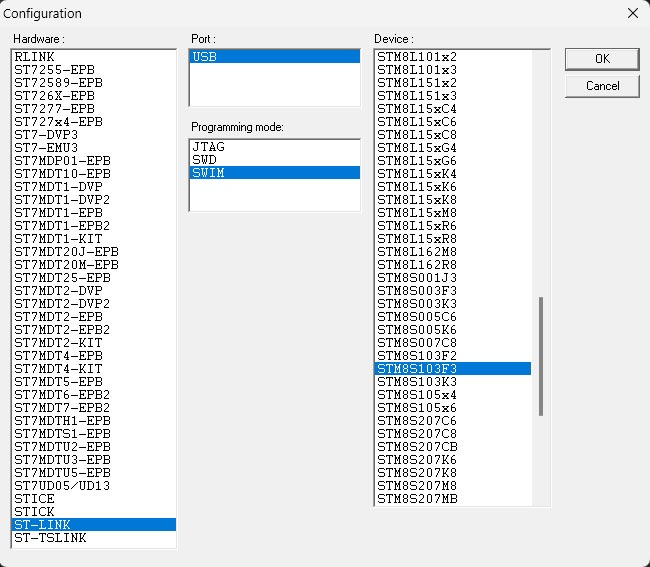
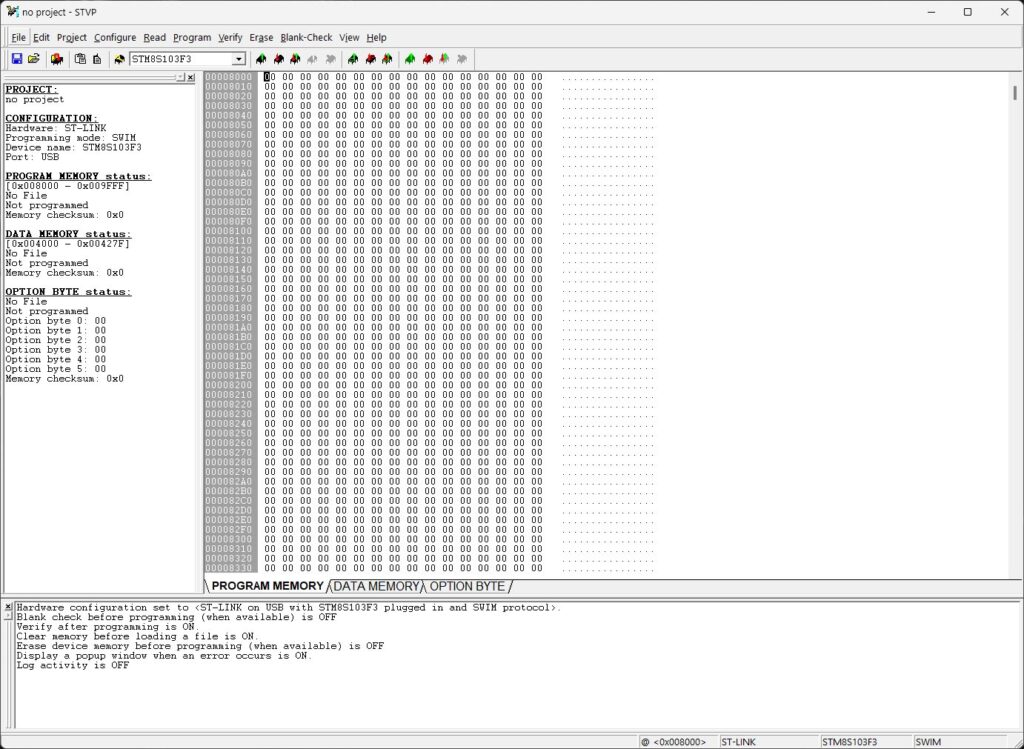
ST Visual Programmer (STVP) is a GUI tool from STMicroelectronics to program and read STM8 microcontrollers using ST-Link programmer/debugger tool. You can get this tool from STM website. When installing, click Yes to all driver installation prompts. This is important for using the ST-Link debugger later. If you are asked to choose a configuration when you launch the application, choose the following.
What’s Next?
If everything was installed correctly, we are ready for the next part of this tutorial series. In the next one, we will write our first program using VS Code, compile it with NakenASM and upload it with both the STM8FlashTool and STVP. Make sure you get the parts we asked you to get in the previous tutorial. We are going to blink some lights. Now check out the next tutorial below.
Wiring Up & Writing Your First Blink Program Using Assembly Language : Learn Microcontroller with STM8S – Tutorial Part #4
Links
- Download VS Code
- Setting up Visual Studio Code
- Getting Started with PlatformIO – Unified IDE for Embedded Software Development
- NakenASM – Official Website
- NakenASM – GitHub
- Windows Terminal – GitHub
- STM8FlashTool – PlatformIO
- STVP – ST Microelectronics
Short Link
- A short URL to this page – https://www.circuitstate.com/installstm8tools


